

But we can use HTML and inline CSS in the HTML post/page editor, in the Excerpt module of the post editor, and in Text widgets (to format and style their content). Some HTML can also be used in image and category descriptions as well as in comments
This article is for users who aren’t familiar with HTML and inline CSS yet, and probably find them intimidating. I hope you’ll find it encouraging to know that when I started blogging I knew absolutely nothing about them myself, when I was first shown HTML and CSS I ran away in terror, and for a long time I considered them an undecipherable jumble that was totally beyond me (and would no doubt remain so forever, because I was just a regular guy who happened to blog a little, not a computer programmer)…
A. Basics and terminology
1. HTML tags
HTML uses standardized words or abbreviations and other symbols inside angle brackets.
Examples:
Examples:
IMPORTANT!
If the HTML of a post includes an opening strong tag without its corresponding closing one, you’ll see your whole main page from that point on turn bold; likewise with other tags that have a visual effect on the text.
If the HTML of a post includes an unpaired closing div tag (tag for sections), the structure of your main page is disrupted: you’ll probably see your sidebar drop to the bottom of the page or some other major layout issue (one of the most common complaints in the WP forums).
If the HTML of a post includes an unpaired closing div tag (tag for sections), the structure of your main page is disrupted: you’ll probably see your sidebar drop to the bottom of the page or some other major layout issue (one of the most common complaints in the WP forums).
To prevent such accidents, one of your first steps when setting up a blog should be to go to Settings > Writing and enable the option “WordPress should correct invalidly nested XHTML automatically”.
For more on this see my post Sidebar at the bottom and related issues.
<blockquote>
<h3>
<h3>
Each one of these is an HTML tag.
2. Start & end tag pairs
Most tags must come in pairs that enclose some content: an opening or start tag that means “mark as such from this point”, and a corresponding closing or end tag (same word or abbreviation preceded by a slash) that means “mark as such up to this point”. Examples:
<em>TEXT HERE</em>
<strong>TEXT HERE</strong>
<strong>TEXT HERE</strong>
Meaning: the enclosed text must be emphasized or strongly emphasized.
Visible result: as a rule, italics or bold respectively.
Visible result: as a rule, italics or bold respectively.
3. Self-contained tags
A few tags mean just “insert this here”, so they are by nature self-contained (no start & end pair) – for instance the tag for a line break:
<br />
In XHTML (the rigorous version of HTML that WordPress uses), self-contained tags must also have their proper closure: as the example shows, they need a space and a slash before the closing angle bracket.
4. Tag pairs inside other tag pairs act cumulatively
A tag pair inside another tag pair won’t cancel the effect of the outside one, it will add its own effect (except if they’re mutually contradictory). Examples:
<em><strong>BOLD ITALICS HERE</strong></em>
<em>ITALICS HERE <strong>BOLD ITALICS HERE</strong> ITALICS CONTINUED</em>
<em>ITALICS HERE <strong>BOLD ITALICS HERE</strong> ITALICS CONTINUED</em>
5. Some tag pairs are part of tag complexes
Some tag pairs are only used in combination with other related tag pairs. For example, to create an automatically numbered list you enclose each list item in a li pair, and you enclose the whole list in an ol pair:
<ol>
<li>ITEM ONE</li>
<li>ITEM TWO</li>
<li>ITEM THREE</li>
</ol>
<li>ITEM ONE</li>
<li>ITEM TWO</li>
<li>ITEM THREE</li>
</ol>
6. Attributes and values
Opening and self-contained tags can or must contain additional functioning elements after the main word or abbreviation. These elements are called attributes, and each attribute accepts a variable value.
For example, the (self-contained) tag for an image is this:
<img />
Meaning: insert image here. Naturally, this won’t have any effect unless you say which image must be inserted:
<img src="IMAGE URL HERE" />
In this case, src (source) is the attribute and the URL is its value.
Attributes are again standardized words or abbreviations, and the form of each attribute with its value is also standardized: space, then attribute, then equals sign, then value inside straight quotation marks.
Attributes are again standardized words or abbreviations, and the form of each attribute with its value is also standardized: space, then attribute, then equals sign, then value inside straight quotation marks.
Some attributes, such as the src of the above example, are mandatory; some other attributes are optional: they may be needed or not. For example, you can specify the image alignment (if you don’t want the default one), and you can specify a certain pixel width (if you don’t want to display the image in its original dimensions):
<img src="IMAGE URL HERE" class="alignright" width="180" />
When a tag contains more than one attribute, as in this example, the order of the attributes doesn’t matter.
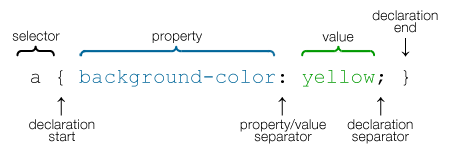
7. The style attribute
A very special case is the style attribute. Instead of a single value, it accepts multiple properties and values. As an example, here’s the code of the “Important” boxed note I placed near the beginning of this post:
<div style="float:right;width:30%;font-size:75%;border:1px solid #db2645;margin:12px 0 0 24px;padding:12px 12px 0 12px;">
TEXT HERE
</div>
TEXT HERE
</div>
The style attribute, and the properties and values you can use with it, are inline CSS. Details in a companion introductory post (forthcoming).
8. HTML entities
HTML entities are used to display various symbols (including accented characters you don’t have on your keyboard). They are standardized combinations of characters or numbers preceded by an ambersand and followed by a semicolon. Examples:
☆ for ☆
♬ for ♬
♬ for ♬
See here for lists of symbols and corresponding HTML entities. The decimal versions should be preferred (more symbols available, more browser-safe).
See here how you can modify their appearance.
B. Commonly used HTML
1. Text transformations
The following tag pairs can be used to mark any portion of the text (characters or words or phrases inside a paragraph, or a complete paragraph, or a whole section).
Italics:
<em>TEXT HERE</em>
<i>TEXT HERE</i>
<i>TEXT HERE</i>
Bold:
<strong>TEXT HERE</strong>
<b>TEXT HERE</b>
<b>TEXT HERE</b>
The em and strong tags are semantic while the i and b tags are visual only. Use the former (except in the very rare case that a theme doesn’t render them as italics and bold).
Superscripted and subscripted text:
<sup>TEXT HERE</sup>
<sub>TEXT HERE</sub>
<sub>TEXT HERE</sub>
Size and vertical displacement are fixed; for adjustable alternatives
<del>TEXT HERE</del>
2. Links
Simple text link:
<a href="URL HERE">CLICKABLE TEXT HERE</a>
Text link that opens in a new browser window or tab:
<a href="URL HERE" target="_blank">CLICKABLE TEXT HERE</a>
The visual differentiation of a text link varies from theme to theme; usually the clickable text is colored or underlined. The default styling can be changed if you add the style attribute with the desired properties and values.
For an image link you paste the code for the image in place of the clickable text.
For links to specific points down a page, or to specific points on a different page, see my post Links to specific points on a page.
3. Inserts
Line break:
<br />
You need it in Text widgets only. In the HTML post/page editor you simply press return (the actual result is a br tag, but the editor hides it from view).
Divider line:
<hr />
This tag produces a thin, full-width, non-customizable horizontal line. For customizable alternatives see my post Divider lines.
Image (with required attributes only):
<img src="IMAGE URL HERE" alt="DESCRIPTION HERE" />
To get a URL for an image, you upload it from your computer to your blog via Media > Add New. You can also use the URL of an image stored to a different site, but using images uploaded to your blog means faster loading, plus no risks if the other site doesn’t work or if the original image gets relocated or removed.
The alt text should be a description of the image. It shows up in case the browser cannot load the image, it is read by programs for visually impaired users, and it’s important for search engines.
The code displayed above will display the image in its original pixel dimensions (except if the image is wider than the maximum allowed on the theme you’re using: in that case the theme will automatically downsize the image to that maximum). To display a scaled down version, you can add the width attribute with the desired value; for example:
<img src="IMAGE URL HERE" alt="TEXT HERE" width="123" />
But some browsers may not take heed of the width attribute, especially in Text widgets, and especially if the image isn’t uploaded to your blog. Better use the style attribute instead:
<img src="IMAGE URL HERE" alt="TEXT HERE" style="width:123px;" />
4. The p, div, and span tag pairs
The p tag pair marks a paragraph:
<p>TEXT HERE</p>
Default styling: block of regular text, with a bottom margin (blank space below the text block).
In a Text widget you need this tag pair to create a regular paragraph. Instead of that, you can check the option “Automatically add paragraphs” and press return twice, but only if the content of the widget doesn’t include code.
For a regular paragraph in the HTML post/page editor, you simply press return twice (the actual result is a p tag pair that encloses the paragraph, but the editor hides it from view). You enclose a paragraph in a p tag pair, with the style attribute added, when you wish to modify the default styling:
<p style="PROPERTIES AND VALUES HERE">TEXT HERE</p>
The div tag pair marks a section (content block). Used to style that section any way you like:
<div style="PROPERTIES AND VALUES HERE">CONTENT HERE</div>
A div tag pair can contain anything. So when you want to apply the same change to a series of paragraphs or a complete post, don’t use p tag pairs with the same style properties and values again and again: use one div tag pair.
A div tag pair can contain subordinate (“nested”) div tag pairs; for example:
<div style="PROPERTIES AND VALUES HERE">
CONTENT WITH SOME STYLING
<div style="DIFFERENT PROPERTIES AND VALUES HERE">
CONTENT WITH DIFFERENT OR ADDITIONAL STYLING
</div>
CONTENT WITH SOME STYLING CONTINUED
</div>
CONTENT WITH SOME STYLING
<div style="DIFFERENT PROPERTIES AND VALUES HERE">
CONTENT WITH DIFFERENT OR ADDITIONAL STYLING
</div>
CONTENT WITH SOME STYLING CONTINUED
</div>
The span tag pair is used to style characters, words or phrases inside a paragraph:
<span style="PROPERTIES AND VALUES HERE">TEXT HERE</span>
Don’t use a span tag pair to style a complete paragraph or any other section: as already shown, for a paragraph you use a p tag pair, for a larger section you use a div tag pair.
5. Automatically styled text blocks
Quotation:
<blockquote>TEXT HERE</blockquote>
Note: The visual differentiation varies from theme to theme
Headings:
<h1>TEXT HERE</h1>
<h2>TEXT HERE</h2>
<h3>TEXT HERE</h3>
<h4>TEXT HERE</h4>
<h5>TEXT HERE</h5>
<h6>TEXT HERE</h6>
<h2>TEXT HERE</h2>
<h3>TEXT HERE</h3>
<h4>TEXT HERE</h4>
<h5>TEXT HERE</h5>
<h6>TEXT HERE</h6>
Again the visual differentiation varies from theme to theme, plus these tags have a meaning for search engines and screen reader programs. For both of these reasons, h tags should only be used for actual headings: don’t use these tags (or the corresponding buttons of the Visual editor) to change the size or the color of your main text.
The default styling of blockquotes and headings can be changed if you add the style attribute with the desired properties and values.
6. Lists
“Unordered” (usually bulleted) list:
<ul>
<li>ITEM ONE</li>
<li>ITEM TWO</li>
<li>ITEM THREE</li>
</ul>
<li>ITEM ONE</li>
<li>ITEM TWO</li>
<li>ITEM THREE</li>
</ul>
“Ordered” (automatically numbered) list:
<ol>
<li>ITEM ONE</li>
<li>ITEM TWO</li>
<li>ITEM THREE</li>
</ol>
<li>ITEM ONE</li>
<li>ITEM TWO</li>
<li>ITEM THREE</li>
</ol>
The default styling can be changed if you add the style attribute with the desired properties and values.
For an example of a list inside a list see here.
For an example of a list inside a list see here.
7. Tables
Table coding is used to display content as a group of cells arranged in rows and columns.
Required tag pairs:
<table></table> (for the whole table)
<tbody></tbody> (for the main body of the table)
<tr></tr> (for each row)
<td></td> (for each cell)
<tbody></tbody> (for the main body of the table)
<tr></tr> (for each row)
<td></td> (for each cell)
For example, a simple 3-row 2-column table would be like this:
<table>
<tbody>
<tr><td>R1C1 CONTENT HERE</td><td>R1C2 CONTENT HERE</td></tr>
<tr><td>R2C1 CONTENT HERE</td><td>R2C2 CONTENT HERE</td></tr>
<tr><td>R3C1 CONTENT HERE</td><td>R3C2 CONTENT HERE</td></tr>
</tbody>
</table>
<tbody>
<tr><td>R1C1 CONTENT HERE</td><td>R1C2 CONTENT HERE</td></tr>
<tr><td>R2C1 CONTENT HERE</td><td>R2C2 CONTENT HERE</td></tr>
<tr><td>R3C1 CONTENT HERE</td><td>R3C2 CONTENT HERE</td></tr>
</tbody>
</table>
For a detailed tutorial see my post Table coding for wordpress.com users.
8. Splitting content – two special wordpress.com tags
The read-more tag:
<!-–more-–>
Truncates the content of a post on the main posts page (as well as on category/archive pages, if those pages normally display full posts), and places a link to the rest of the post.
The link text varies from theme to theme (“Read more”, “Continue reading”, or various other versions). You can replace that text with your own, this way:
<!-–more YOUR CUSTOM TEXT HERE-–>
See Support doc as well.
The next-page tag:
<!-–nextpage-–>
Splits a post or a static page into a series of subpages, with a series of numbers as links to these subpages (as in this post).
See Support doc as well.
Watch out: never paste either of these tags inside any other HTML tag pair. Doing so will separate the opening HTML tag from the closing one, with results as described in the “Important” boxed note on page 2 of this post.
C. Useless HTML tags
1. Deprecated tags
<basefont />
<center></center>
<dir></dir>
<font></font>
<menu></menu>
<s></s>
<strike></strike>
<u></u>
<xmp></xmp>
<center></center>
<dir></dir>
<font></font>
<menu></menu>
<s></s>
<strike></strike>
<u></u>
<xmp></xmp>
You may see them if you copy outdated code from other sources.
Some might work but aren’t recommended, some won’t work at all.
Some might work but aren’t recommended, some won’t work at all.
2. Tags you can’t use in WordPress.com blogs
<applet></applet>
<embed></embed>
<frame />
<iframe></iframe>
<form></form>
<input />
<marquee></marquee>
<meta></meta>
<object></object>
<script></script>
<textarea></textarea>
<embed></embed>
<frame />
<iframe></iframe>
<form></form>
<input />
<marquee></marquee>
<meta></meta>
<object></object>
<script></script>
<textarea></textarea>
We’re not allowed to use these tags, for security reasons (see relevant Support doc). If you type or copypaste any of these tags, it will automatically be stripped out – with the exception of codes from some “trusted partners” such as YouTube: in that case the codes are automatically converted to the appropriate WP-specific shortcode.
Where is the theme CSS and how do I edit it?
(For users who’ve bought the Custom Design upgrade)
Basic terms
Where is the CSS of the theme?
You can view the original stylesheet if you
go to Appearance > Custom Design > CSS, [see Update below] click “Edit” next to “Mode: Add-on” in the Publish module, and click the “theme’s CSS” link:
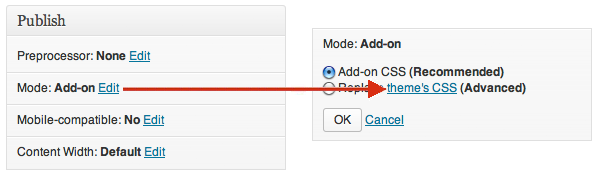
Update WP replaced the regular CSS editor with a narrower new editor in a black overlay sidebar over the blog preview. Το access the old CSS editor (including the module shown above), visit your main dashboard screen and change its URL from:
BLOG URL HERE/wp-admin/
to:
BLOG URL HERE/wp-admin/themes.php?page=editcss
(You can bookmark the page, so that you won’t have to enter this URL each time you want to visit the editor.)
BLOG URL HERE/wp-admin/
to:
BLOG URL HERE/wp-admin/themes.php?page=editcss
(You can bookmark the page, so that you won’t have to enter this URL each time you want to visit the editor.)
Why is the stylesheet hidden like this?
When the link to the CSS of the theme was more prominent, inexperienced users would often copypaste the entire stylesheet into the CSS editor and start making changes to it. This a mistake: at best, it makes browsers unnecessarily read the whole stylesheet twice; but it can also create conflicts, because what takes precedence over what is very complicated. You can copy the original stylesheet and save it in a text file for reference, but you don’t copypaste it into the CSS editor (if you don’t like wondering why this or that didn’t work).
How do I make CSS changes on wordpress.com?
Unless you are an expert user who wishes to make very extensive changes, you retain the default edit option, i.e. the add-on mode, [Update: in the new CSS editor you do not check the option “Don’t use the theme’s original CSS”] and you enter only the selectors for the elements you wish to modify and only the rules for the properties & values you wish to add or override (after deleting the welcome message, of course). Apart from avoiding redundancies and possible conflicts, this also allows you to keep track of the changes you make, and remove or modify any of these changes without fearing you might mess the original.
Example
The original stylesheet of a certain theme includes this:
If you wish to make the post titles a bit larger and italicized, the only thing you’ll add in the CSS editor is this:
When you wish to apply the same change to various elements, you can combine the respective selectors. For instance, if you wish to italicize the blog title, the post titles and the post metadata in the above theme, you add this:
Selectors vary from theme to theme, and so does the structure of each theme. In addition, the less than elementary changes may require some inventiveness. For these reasons you shouldn’t expect to find manuals that give you simple, direct, one-size-fits-all answers to how-to questions. You need to familiarize yourself with the various CSS properties and their possible values, but you’ll always have to examine the particular situation in the particular theme you’re using. To examine your blog and identify elements, selectors and rules, as well as try out changes, you can use the Firebug add-on in Firefox, or similar developer extensions in other browsers.
You can also learn a lot in the wordpress.com CSS forum: you can study replies in general, search for a past reply to a specific question, and post your own questions. Note that users who’ve bought the Custom Design upgrade are entitled to staff support. Also note that replies in the CSS forum generally assume that you’re using the CSS editor as recommended.
No comments:
Post a Comment